What is Postman?
Postman is an API platform for building and using APIs. Postman simplifies each step of the API lifecycle and streamlines collaboration so you can create better APIs—faster. Source: Postman API Platform
Useful articles
How to configure Postman API requests?
Prerequisites
Presented test requests in this blog post are written against this kind of Product API. This Minimal API provides REST endpoints to interactive with products.
  public static class EndpointRouteBuilderExtensions
    {
        public static void AddProductApiEndpoints(this IEndpointRouteBuilder endpoints)
        {
            endpoints.MapPost("/products", async ([FromBody] Product product, [FromServices] ProductRepository productRepository) =>
            {
                await productRepository.SaveAsync(product);
                return Results.Created($"/products/{product.Id}", product);
            })
            .RequireAuthorization("ProductsPolicy");

            endpoints.MapGet("/products", async ([FromServices] ProductRepository productRepository) =>
            {
                var products = await productRepository.ListAsync();
                return products?.Count > 0 ? Results.Ok(products) : Results.NoContent();
            })
            .RequireAuthorization("ProductsPolicy");

            endpoints.MapPut("/products/{productId}", async ([FromUri] int productId, [FromBody] Product product, [FromServices] ProductRepository productRepository) =>
            {
                await productRepository.UpdateAsync(productId, product);
                return Results.Ok();
            })
            .RequireAuthorization("ProductsPolicy");

            endpoints.MapGet("/products/{productId}", async ([FromUri] int productId, [FromServices] ProductRepository productRepository) =>
            {
                var product = await productRepository.GetAsync(productId);
                return product == null ? Results.NoContent() : Results.Ok(product);
            })
            .RequireAuthorization("ProductsPolicy");

            endpoints.MapDelete("/products", async ([FromServices] ProductRepository productRepository) =>
            {
                await productRepository.DeleteAllAsync();
            })
            .RequireAuthorization("ProductsPolicy");
        }
    }
Let's get started. Open Postman client:)
1. Set Postman environment variables
These environment variables contains all required information to fetch bearer token from the OIDC token endpoint. In this sample I will use Duende demo server as a OIDC provider.
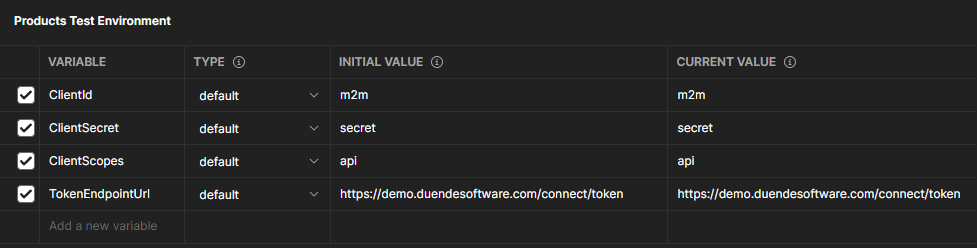
Get more information about variable scopes from here.
2. Create a collection for your requests
Separate collection makes easier to maintain and configure requests because collection level enables to use shared pre-request scripts which are executed before every request inside the collection.

3. Shared pre-request scripts in collection level
You can configure pre-request scripts when you have selected the collection.
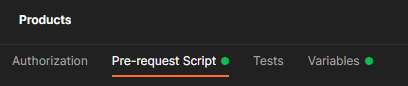
Because API requires authentication/authorization we need to get bearer token before reaching the API. The purpose of this pre-request script is to fetch bearer token from OIDC token endpoint. All configuration values like ClientId and Secret are fetched from the environment variables.
var Header = require('postman-collection').Header;

pm.sendRequest({
    url: pm.environment.get("TokenEndpointUrl"),
    method: 'POST',
    header: {
        'Content-Type': 'application/x-www-form-urlencoded'
    },
    body: {
        mode: 'urlencoded',
        urlencoded: [{
                key: "grant_type",
                value: 'client_credentials',
                enabled: true
            },
            {
                key: "client_id",
                value: pm.environment.get("ClientId"),
                enabled: true
            },
            {
                key: "client_secret",
                value: pm.environment.get("ClientSecret"),
                enabled: true
            },
            {
                key: "scope",
                value: pm.environment.get("ClientScopes"),
                enabled: true
            }
        ]
    }
}, function(err, res) {
    pm.request.headers.append(Header.create('Bearer ' + res.json().access_token, 'Authorization'));
});
Now bearer token is fetched every time before actual request is executed. You could also store fetched bearer token to the variable to minimize token fetches.
4. Test requests
Let's start to write actual request tests. Each request has Tests tab where Tests can be written.

Example test plan
The following tests are created to test product creation, update, delete and get operations. Next I'll present sample CURL command and actual Postman test written with Javascript.
Add new product
curl --location --request POST '/products' \
--header 'Content-Type: application/json' \
--data-raw '{
  "name":"Product 1",
  "price": 0.2
}'
This test verifies that product is successfully created. Status code must be 201 (Created) and header must contain path to product 1.
pm.test("Status code is 201", function () {
    pm.response.to.have.status(201);
});

pm.test("Location header is /products/1", function () {
    pm.expect(pm.response.headers.get("location")).to.eql("/products/1")
});
List all products
curl --location --request GET '/products'This test verifies that newly created product exists. Status code must be 200 (OK) and length of the product arrays must be 1. Test also verifies that existing product is Product 1.
pm.test("Status code is 200", () => {
    pm.response.to.have.status(200);
});

pm.test("One product found", () => {
    const responseJson = pm.response.json();
    pm.expect(responseJson.length).to.eql(1);
});

pm.test("Right product found", () => {
    const responseJson = pm.response.json();
    pm.expect(responseJson[0].name).to.eql("Product 1");
    pm.expect(responseJson[0].price).to.eql(0.2);
});
Update product
curl --location --request PUT '/products/1' \
--header 'Content-Type: application/json' \
--data-raw '{
  "id": 1,
  "name": "Product 1 (fixed name)",
  "price": 0.3
}'
This test verifies that product is successfully updated. Status code must be 200 (OK).
pm.test("Status code is 200", function () {
    pm.response.to.have.status(200);
});
Get Product
curl --location --request GET '/products/1'This test verifies that updated Product 1 exists. Status code must be 200 (OK).
pm.test("Status code is 200", function () {
    pm.response.to.have.status(200);
});

pm.test("Product 1 found", () => {
    const responseJson = pm.response.json();
    pm.expect(responseJson.id).to.eql(1)
    pm.expect(responseJson.name).to.eql("Product 1 (fixed name)");
    pm.expect(responseJson.price).to.eql(0.3);
});
Delete all products
curl --location --request DELETE '/products'This test deletes all products. Status code must be 200 (OK).
pm.test("Status code is 200", function () {
    pm.response.to.have.status(200);
});
Verify that products are deleted
curl --location --request GET '/products' This test verifies that all products are deleted. Status code must be 204 (No Content).
pm.test("Status code is 204", function () {
    pm.response.to.have.status(204);
});
Configure tests to be executed in Azure DevOps
1. Export test requests and environment variables
Postman provides Export functionality which creates a JSON file from your collection requests and environment variables.
2. Remove Client Secret from environment JSON configuration
Current setup has sensitive information (ClientId and ClientSecret) stored in environment variables so these must be removed from Environment.json file before commiting it ex. to source control.
3. Create YAML template
Client Id and Client Secret are fetched from the Pipeline variables where those are configured to be kept as a secret value.
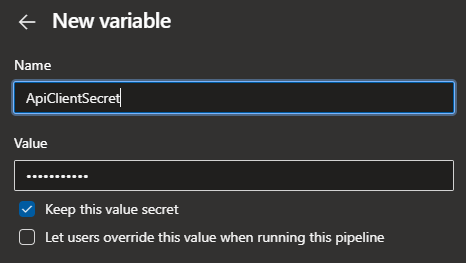
Pipeline variable values are then passed to the integration tests pipeline template.
- template: pipelines/integration-tests-pipeline.yml
  parameters:
    clientId: $(ApiClientId)
    clientSecret: $(ApiClientSecret)
Integration tests pipeline template fetches integration tests artifact and installs CLI tool called "Newman" which is used to execute Postman tests in Azure DevOps.
parameters:
    clientId: string
    clientSecret: string

stages:
- stage: IntegrationTests
  displayName: Integration Tests
  jobs:

  - job: IntegrationTests
    displayName: Execute integration tests
    steps:

    - task: DownloadBuildArtifacts@0
      displayName: 'Download integration tests artifact'
      inputs:
        buildType: 'current'
        downloadType: 'single'
        artifactName: 'tests'
        downloadPath: '$(System.ArtifactsDirectory)'

    - task: Npm@1
      displayName: Install newman CLI
      inputs:
        command: custom
        verbose: false
        customCommand: install -g newman

    - task: CmdLine@2
      displayName: Execute integration tests (API Client 1)
      inputs:
        script: newman run $(System.ArtifactsDirectory)/tests/IntegrationTests.json -e $(System.ArtifactsDirectory)/tests/Environment.json --env-var ClientId=${{parameters.clientId}} --env-var ClientSecret=${{parameters.clientSecret}}
Newman has --env-var parameter which enables to pass sensitive configuration values from ex. Azure DevOps pipeline variables.
Summary
Postman provides an easy and powerful way to create automated integration tests which can be executed ex. in Azure DevOps. I was really nice that you could write Postman test scripts with javascript. Test object model is easy to learn and there are lot of good documentation available. At least for a simple integration cases this is a very good tool. Sharing test scripts between tests is difficult and one reason why you should consider other frameworks in very complex test cases.

Comments