Deploy .NET 6 application and infrastructure to Azure with Bicep and YAML

This week I worked with Azure Bicep and YAML to deploy Azure infrastructure. This blog post shows how to utilize Azure Bicep and YAML ("build blocks") to deploy the Weather Forecast application and infrastructure to Azure. This sample utilizes the Weather Forecast application which was created in the earlier blog post.
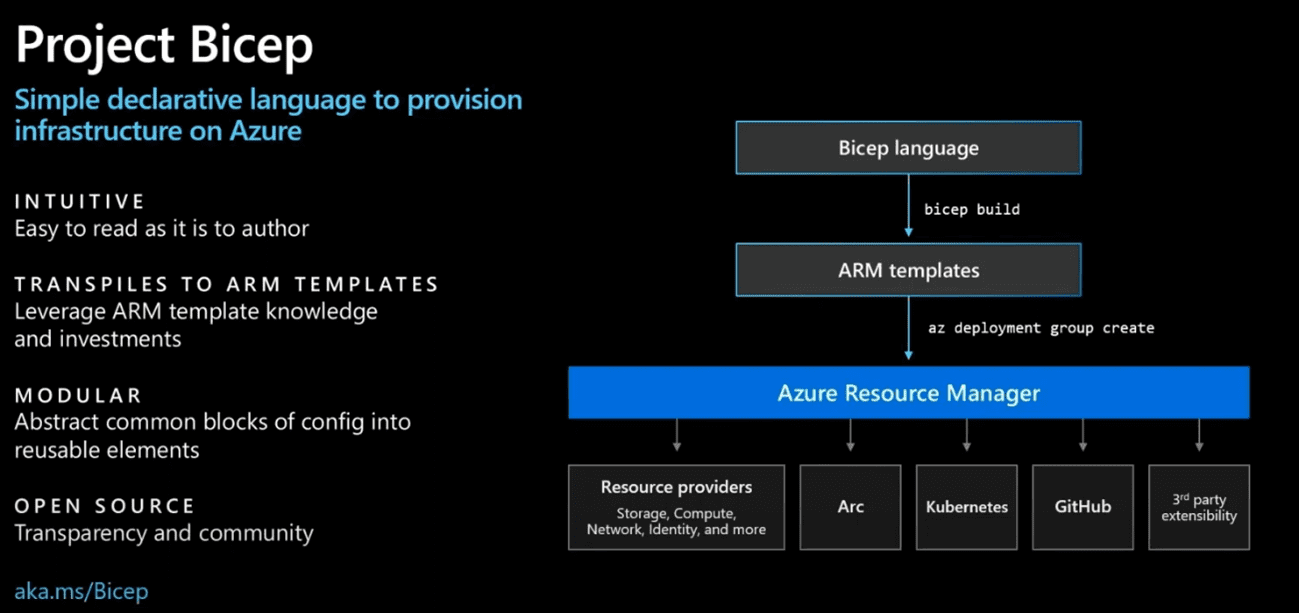
What is Azure Bicep?
Shortly Azure Bicep is a declarative domain-specific language (DSL) to deploy Azure resources. You can use Bicep instead of JSON to develop your Azure Resource Manager templates (ARM templates). Bicep is a transparent abstraction over ARM template JSON and doesn't lose any of the JSON template capabilities. During deployment, the Bicep CLI converts a Bicep file into ARM template JSON. Source: What is Bicep?
More materials to check:
- Install Bicep Tools
- Bicep on Microsoft Learn
- Understand the structure and syntax of Bicep files
- Data type in Bicep
- Parameters in Bicep
- Variables in Bicep
- Define resources with Bicep and ARM templates
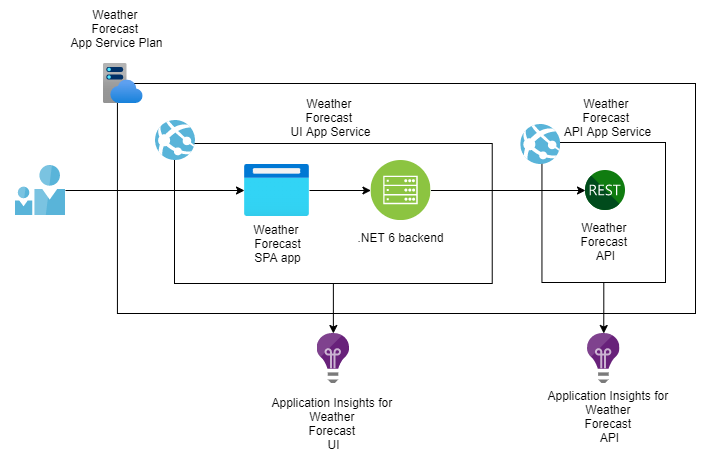
Weather Forecast Azure infrastructure
Weather Forecast service has two App Services (UI and API) and Application Insights. This Azure infrastructure is deployed using Bicep.
Before starting
Download and install the Azure CLI tool from here. After that install Azure Bicep CLI with the following command:
az bicep installWeather Forecast Bicep configuration
The final infrastructure configuration looks like this (created with Visual Studio Code Bicep file visualizer)
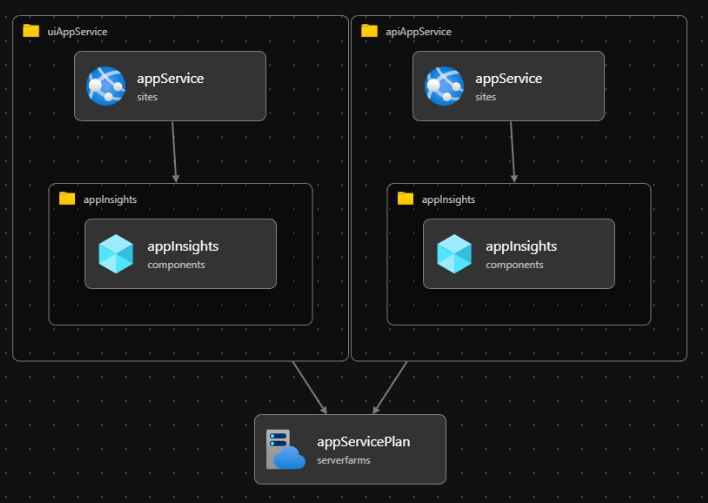
This sample uses two Bicep modules: App Service Module and Application Insights Module. Bicep modules are a powerful way to organize and encapsulate complex details into multiple bicep files. A module is just a Bicep file that is deployed from another Bicep file. Source: Bicep Modules
Modules improve readability and reusability when you're building and designing especially complex infrastructure.
Application Insights Bicep Module
This module creates an Application Insights resource for logging purposes. Weather Forecast UI and API components have their own application insight resources. Modules can return output values when the resource is created. This module returns InstrumentationKey of the Application Insight which enables communication between App Service and Application Insights.
@description('Name of the Application Insights')
param applicationInsightsName string
@description('Application Insight Location.')
param applicationInsightsLocation string = 'West Europe'
@description('Tags.')
param tags object
resource appInsights 'Microsoft.Insights/components@2020-02-02-preview' = {
  name: applicationInsightsName
  location: applicationInsightsLocation
  kind: 'web'
  properties: {
    Application_Type: 'web'
    publicNetworkAccessForIngestion: 'Enabled'
    publicNetworkAccessForQuery: 'Enabled'
  }
  tags:tags
}
output instrumentationKey string = appInsights.properties.InstrumentationKey
App Service Bicep Module
This module is a reusable App Service component that also creates Application Insights and connects Application Insight and App Service together. Basically Application Insights Module is utilized inside this App Service Module. Application Insights Module returns InstrumentationKey as a output parameter and this value is set to the application settings of the App Service.
Because Weather Forecast UI and API utilizes .NET 6 Framework remember to set 'netFrameworkVersion' to 6.
@description('Name of the App Service Plan')
param appServiceName string
@description('ID of App Service Plan.')
param appServicePlanId string
@description('Location.')
param location string = 'West Europe'
@description('Tags.')
param tags object
module appInsights './appinsights.bicep' = {
  name: 'appinsights-${appServiceName}'
  params: {
    applicationInsightsName: 'appi-${appServiceName}'
    applicationInsightsLocation: location
    tags: tags
  }
}
resource appService 'Microsoft.Web/sites@2021-02-01' = {
  name: appServiceName
  location: location
  properties:{
    serverFarmId: appServicePlanId
    siteConfig:{
      alwaysOn: true
      ftpsState: 'Disabled'
      netFrameworkVersion: 'v6.0'
      appSettings: [
        {
          'name': 'APPINSIGHTS_INSTRUMENTATIONKEY'
          'value': appInsights.outputs.instrumentationKey
        }
      ]
    }
    httpsOnly: true
  }
  tags:tags
}
output appServiceId string = appService.id
Main Bicep File
The Main Bicep file orchestrates the building of the Azure infrastructure. It first creates a shared App Service Plan and then App Services for Weather Forecast UI and API. Parameters like names and App Service Plan SKU are retrieved from the separate parameter file.
@description('Name of the App Service Plan')
param appServicePlanName string
@description('The SKU of App Service Plan.')
param appServicePlanSku string = 'S1'
@allowed([
  'Win'
  'Linux'
])
@description('Select the OS type to deploy.')
param appServicePlanPlatform string
@description('Name of the UI App Service')
param uiAppServiceName string
@description('Name of the API App Service')
param apiAppServiceName string
var defaultTags = {
  Team: 'DevTeam1'
}
resource appServicePlan 'Microsoft.Web/serverfarms@2021-02-01' = {
  name: appServicePlanName
  location: resourceGroup().location
  sku: {
    name: appServicePlanSku
  }
  kind: ((appServicePlanPlatform == 'Linux') ? 'linux' : 'windows')
  tags:defaultTags
}
module uiAppService './webapp.bicep' = {
  name: 'uiAppService'
  params: {
    appServiceName: uiAppServiceName
    appServicePlanId: appServicePlan.id
    location: resourceGroup().location
    tags: defaultTags
  }
}
module apiAppService './webapp.bicep' = {
  name: 'apiAppService'
  params: {
    appServiceName: apiAppServiceName
    appServicePlanId: appServicePlan.id
    location: resourceGroup().location
    tags: defaultTags
  }
}
Parameters file
The parameter file contains all parameters that are needed for creating the Azure infrastructure.
{
  "$schema": "https://schema.management.azure.com/schemas/2019-04-01/deploymentParameters.json#",
  "contentVersion": "1.0.0.0",
  "parameters": {
    "appServicePlanName": {
      "value": "plan-weatherforecast"
    },
    "appServicePlanSku": {
      "value": "S1"
    },
    "appServicePlanPlatform": {
      "value": "Win"
    },
    "uiAppServiceName": {
      "value": "app-weatherforecastui"
    },
    "apiAppServiceName": {
      "value": "app-weatherforecastapi"
    }
  }
}
Deploy infrastructure to Azure locally using Bicep CLI
Log in first to Azure
az login --tenant 00000000-0000-0000-0000-000000000000Select Azure subscription
az account set --subscription 00000000-0000-0000-0000-000000000000Deploy infrastructure to Azure with Bicep
az deployment group create --resource-group rg-weather-forecast --template-file main.bicep --parameters parameters/dev.parameters.json
Other Bicep CLI commands that you should know
Bicep to ARM:
az bicep decompile --file main.jsonARM to Bicep:
az bicep build --file main.bicepHow to configure the application & infrastructure CI/CD pipeline as a code with YAML?
YAML enables you to configure pipelines as a code. I simplified the pipeline presentation in this blog so below you find examples of the most important tasks that are utilized in Infrastructure and .NET 6 API application pipelines.
Infrastructure YAML pipeline in Azure DevOps
Infrastructure pipeline deploys Weather Forecast Azure infrastructure.
The following variables are used while deploying infrastructure
variables:
  resourceGroupName: 'rg-weather-forecast'
  location: 'westeurope'
  azureSubscription: 'azure-service-connection'
The build stage contains the job with the following tasks:
- Copy Files create Azure infrastructure artifact
The infrastructure artifact contains main.bicep and parameter files.
- task: CopyFiles@2
  displayName: 'Create infrastructure artifact'
  inputs:
    SourceFolder: 'infrastructure'
    Contents: |
      main.bicep
      parameters/dev.parameters.json
    TargetFolder: '$(Build.ArtifactStagingDirectory)'
- Publish Build Artifacts publishes infrastructure artifacts to the own container
    - task: PublishBuildArtifacts@1
      displayName: 'Publish infrastructure artifact'
      inputs:
        PathtoPublish: '$(Build.ArtifactStagingDirectory)'
        ArtifactName: 'infrastructure'
        publishLocation: 'Container'
The deploy stage contains the job with the following tasks:
- Download infrastructure artifact
 - task: DownloadBuildArtifacts@0
      displayName: 'Download infrastructure artifact'
      inputs:
        buildType: 'current'
        downloadType: 'single'
        artifactName: 'infrastructure'
downloadPath: '$(System.ArtifactsDirectory)' - Deploy infrastructure
Azure CLI task enables you to call Bicep CLI commands so you can utilize the same commands which were tested earlier locally.
- task: AzureCLI@2
  displayName: 'Deploy infrastructure'
  inputs:
    azureSubscription: $(azureSubscription)
    scriptType: 'bash'
    scriptLocation: 'inlineScript'
    inlineScript: |
      az group create \
        --name $(resourceGroupName) \
        --location $(location)
      az deployment group create \
        --name $(Build.BuildNumber) \
        --resource-group $(resourceGroupName) \
        --template-file $(System.ArtifactsDirectory)/infrastructure/main.bicep \
        --parameters @$(System.ArtifactsDirectory)/infrastructure/parameters/dev.parameters.json \
After these phases, Infrastructure is deployed.
.NET 6 API application YAML pipeline in Azure DevOps
.NET 6 API application pipeline deploys Weather Forecast API application to Azure.
The following variables are used while deploying the .NET 6 API application
variables:
  buildConfiguration: "Release"
  dotNetVersion: '6.0.x'
  resourceGroupName: 'rg-weather-forecast'
  location: 'westeurope'
  azureSubscription: 'azure-service-connection'
  dotNetFramework: 'net6.0'
The build stage contains the job with the following tasks:
- Install .NET 6 framework with Use Dot Net @ 2 task
Remember to add this task to install the .NET 6 version. If you're using the preview version of .NET 6 set 'includePreviewVersions' to true.
- task: UseDotNet@2
  displayName: Install .NET Framework version
  inputs:
    packageType: 'sdk'
    version: $(dotNetVersion)
    includePreviewVersions: true
    installationPath: $(Agent.ToolsDirectory)/dotnet
- Build API application project
    - task: DotNetCoreCLI@2
      displayName: Build API application
      inputs:
        command: 'build'
        projects: '**/WeatherForecastApi.csproj'
arguments: --output $(System.DefaultWorkingDirectory)/publish_output --configuration $(buildConfiguration) - Create API application artifact
    - task: DotNetCoreCLI@2
      displayName: Create API application artifact
      inputs:
        command: publish
        publishWebProjects: True
        arguments: '--configuration $(BuildConfiguration) --framework $(dotNetFramework) --output $(Build.ArtifactStagingDirectory)'
zipAfterPublish: True - Publish API application artifact
   - task: PublishBuildArtifacts@1
      displayName: Publish API application artifact
      inputs:
        PathtoPublish: "$(Build.ArtifactStagingDirectory)"
        ArtifactName: "api"
        publishLocation: Container
The deploy stage contains the job with the following tasks:
- Download the API application artifact
    - task: DownloadBuildArtifacts@0
      displayName: Download API application artifact
      inputs:
        buildType: 'current'
        downloadType: 'single'
        artifactName: 'api'
downloadPath: '$(System.ArtifactsDirectory)' - Deploy API application
   - task: AzureWebApp@1
      displayName: Deploy API application
      inputs:
        appType: webApp
        azureSubscription: $(azureSubscription)
        appName: 'app-weatherforecastapi'
        package: "$(System.ArtifactsDirectory)/api/*.zip"
You can check full samples of YAML pipelines from here.
Summary
This was my first touch with Bicep and YAML. I have earlier worked with ARM templates and the graphical editor of Azure DevOps to build pipelines. I'm very impressed with how easy it was to generate infrastructure templates with Bicep and utilize Bicep in YAML-based pipelines.. I would say that Bicep syntax is very developer-friendly. Bicep Modules are also a nice way to structure templates and increase reusability. I'm definitely using Bicep in the future.
Comments