How to use interactive login in PowerShell and query API?

Background
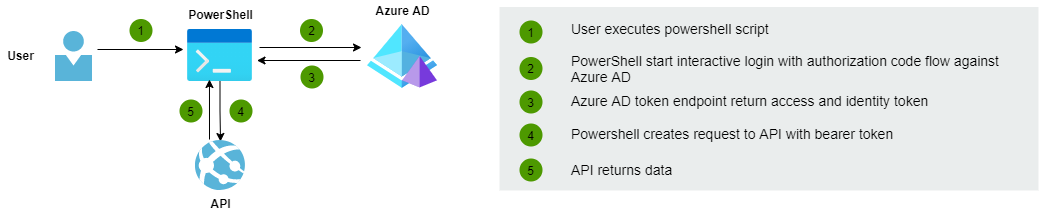
This blog post shows how to create a PowerShell script that authenticates the user against Azure AD and creates a request to API with a bearer token.
Preparations
First, we need to create an Azure AD application. Create applications with the following settings:
Azure AD application for API
- Open your Azure Active Directory and select App registrations
- Select New Registration
- Name: WeatherForecastApi
- Supported account types: Account in this organization directory only
- Redirect URI: Web
- Click Register
- Open Expose an API
- Select 'Add a scope'
- Approve the suggested Application ID URI and click Save and continue
- Scope name: WeatherForecast.Read
- Who can consent?: Admins only
- Admin consent display name: Read the weather forecast
- Admin consent description: Allows the app to read weather forecasts
- State: Enable
- Click Add Scope
Azure AD application for PowerShell script
- Open your Azure Active Directory and select App registrations
- Select New Registration
- Name: PowerShellAutomation
- Supported account types: Account in this organization directory only
- Redirect URI: Public client/native
- Click Register
- Open Authentication
- Under Platform configurations select 'Add a platform'
- Select Mobile and desktop applications
- Add the following URIs under Redirect URIs
- For PowerShell 5.1: https://login.microsoftonline.com/common/oauth2/nativeclient
- For PowerShell core: http://localhost
- Open API permissions
- Select Add a permission
- Under My APIs select WeatherForecastApi
- What type of permissions does your application require?: Delegated permissions
- Select permissions: WeatherForecast.Read
- Click Add permissions
- Click Grant admin consent for Directory
Weather Forecast API
In this sample, we use the default ASP.NET Core template which contains the Weather Forecast Controller but we add authentication.
First Install Microsoft.Identity.Web Nuget package to the project. After that add the following configuration to the ConfigurationServices method in startup:
JwtSecurityTokenHandler.DefaultInboundClaimTypeMap.Clear();
services.AddMicrosoftIdentityWebApiAuthentication(Configuration);
services.AddControllers(options =>
{
    var policy = new AuthorizationPolicyBuilder()
        .RequireAuthenticatedUser()
        .RequireClaim("scp", "WeatherForecast.Read")
        .Build();
    options.Filters.Add(new AuthorizeFilter(policy));
});
Enable the authentication and authorization in the Configure method:
app.UseAuthentication();
app.UseAuthorization();
Add the following settings to the appsettings.json:
"AzureAd": {
    "Instance": "https://login.microsoftonline.com/",
    "Domain": "TENANT.onmicrosoft.com",
    "TenantId": "00000000-0000-0000-0000-000000000000",
    "ClientId": "00000000-0000-0000-0000-000000000000"
}
Open WeatherForecastApi from Azure AD management and get the clientId and add it to the configuration.
Powershell
In this sample, we use the MSAL.PS PowerShell module for handling authentication against Azure AD. Before starting install the following modules:
Install-Module -Name PowerShellGet -Force
Install-Module -Name MSAL.PS
Fill your tenantId, PowerShellAutomation app clientId and WeatherForecast.Read the scope URI to the connection details:
$connectionDetails = @{
'TenantId' = '00000000-0000-0000-0000-000000000000'
'ClientId' = '00000000-0000-0000-0000-000000000000'
'Interactive' = $true
'Scopes' = 'api://00000000-0000-0000-0000-000000000000/WeatherForecast.Read'
}
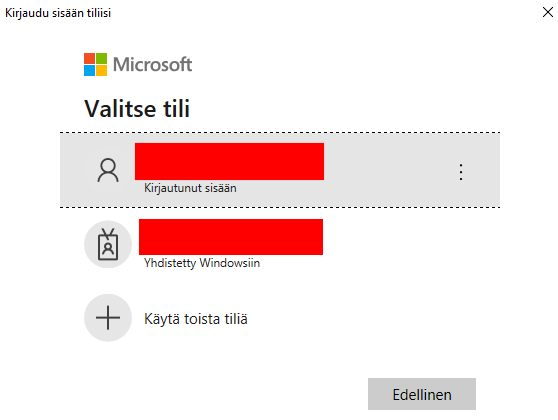
$token = Get-MsalToken @connectionDetailsGet-MsalToken starts the interactive login and prompt windows open:
After authentication, you can get the access token from the token variable. The following code executes the request to the Weather Forecast API with the bearer token:
$accessToken = $token.AccessToken
$headers = @{Authorization = "Bearer $accessToken"}
$url = 'https://localhost:44335/weatherforecast'
$method = 'GET'
$contentType = 'application/json; charset=utf-8'
$response = Invoke-RestMethod -ContentType $contentType -Uri $url -Method $method -Headers $headers -UseBasicParsing
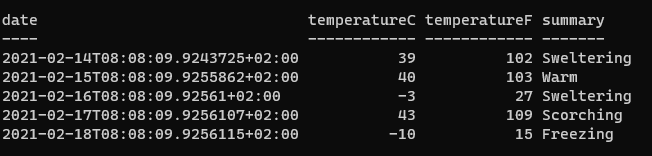
$responseResponse from API:
Happy powershelling!
Comments