Key findings and learnings of Azure AD B2C custom policy configuration with federated authentication

Background
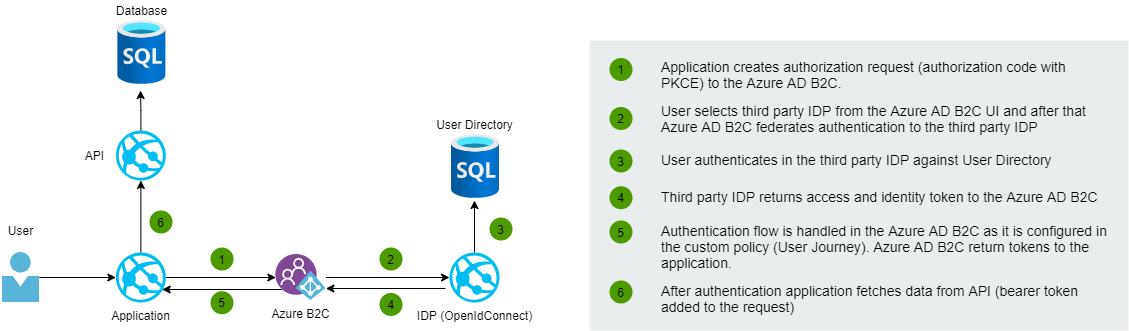
I recently worked on a project where we implemented an application that uses Azure AD B2C as an IDP. In the first phase, users were using local Azure AD B2C to sign up and sign in. The next phase of the project brought federated external IDP sign-in possibilities for the users. This blog post shows how federated sign-in with OpenIdConnect-based IDP is configured by using the Identity Experience Framework (custom policy). At the end of the post, I'll write a little bit about key findings & learnings, and challenges related to custom policies.
What are Azure AD B2C custom policies?
Custom policies enable you to modify the authentication flow based on your complex authentication requirements. With custom policies you have full control of the life cycle of the authentication flow, what claims to return, and how to transform and enrich claims. It is also possible to execute external API requests during the authentication flow. Custom policy configurations are modeled to the XML files. Custom policies require to configuration of several XML files that have references to each other in a hierarchical chain. Before starting you should familiarize yourself with custom policy samples which can be found from GitHub.
An alternative for custom policy is user flows which can be configured directly from the Azure Portal. User flows allow you to configure the most common identity tasks for your applications ex. social media platform authentication, common claim handling, MFA, and layout customization.
More details about user flows and custom policies:
- Custom policies in Azure Active Directory B2C
- User flows in Azure Active Directory B2C
- wheneverAzure Active Directory B2C: Custom CIAM User Journeys
You should remember that Microsoft recommends to use out of the box user flows whenever it's possible. Custom policies are designed primarily for complex authentication scenarios.
Configuration of federated authentication
Next, let's go through the steps that should do when configuring federated authentication with custom policies.
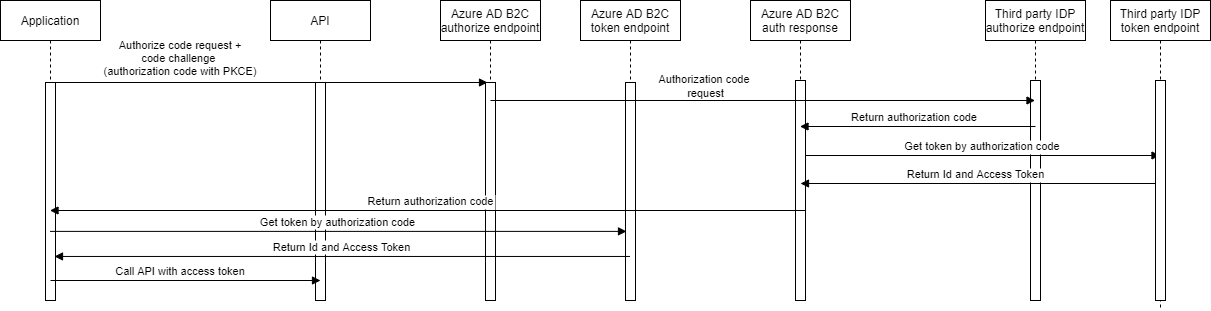
Sign in the flow sequence diagram
1) Configure the client to the third-party IDP
Configurate IDP client to the third party IDP by using authorization code flow. You have to configure ClientId, Client Secret, and Scopes for the client. Later these will be configured to the Azure AD B2C custom policy XML-file.
2) Configure third party IDP client's secret to the Azure AD B2C
The client secret that you got in the previous phase should be configured as a signing key to the Policy Keys under the Identity Experience Framework in Azure AD B2C.
3) Claims provider configuration
Claims Provider configuration in TrustFrameworkExtensions.xml file determines third-partythe IDP settings.
Metadata
The metadata section configurates communication parameters of the third-party OpenIdConnect IDP and client. Metadata is a list of key-value pairs. Check all available configuration keys from here.
CryptographicKeys
Azure AD B2C has a feature that enables you to store secrets and certificates. This feature is known as "Policy keys". You can modify policy keys directly from the Azure AD B2C management view in the Azure Portal. In this case, we configure the third-party IDP client's secret to the policy keys as a signing key. During the technical profile execution, Azure AD B2C retrieves the cryptographic keys from Azure AD B2C policy keys.
OutputClaims
The OutputClaims element configures and maps claims which are returned from the third-party IDP.
OutputClaimsTransformations
The OutputClaimsTransformations configures how output claims are modified or new claims generated. This example follows a social login sample so UPN and Alternative Security ID are generated based on sub value returned by third-party IDP.
<ClaimsProvider>
      <Domain>thirdparty.idp.fi</Domain>
      <DisplayName>Third party IDP</DisplayName>
      <TechnicalProfiles>
        <TechnicalProfile Id="IDP-OAUTH">
          <DisplayName>IDP</DisplayName>
          <Protocol Name="OpenIdConnect" />
          <Metadata>
            <Item Key="ProviderName">IDP</Item>
            <Item Key="METADATA">https://thirdparty.idp.fi/.well-known/openid-configuration</Item>
            <Item Key="ValidTokenIssuerPrefixes">https://thirdparty.idp.fi</Item>
            <Item Key="IdTokenAudience">services.clientId</Item>
            <Item Key="DiscoverMetadataByTokenIssuer">true</Item>
            <Item Key="response_types">code</Item>
            <Item Key="response_mode">form_post</Item>
            <Item Key="scope">openid given_name family_name name phone_number email address</Item>
            <Item Key="HttpBinding">POST</Item>
            <Item Key="UsePolicyInRedirectUri">false</Item>
            <Item Key="client_id">services.clientId</Item>
            <Item Key="SingleLogoutEnabled">true</Item>
          </Metadata>
          <CryptographicKeys>
            <Key Id="client_secret" StorageReferenceId="B2C_1A_IDPCLIENTSECRET" />
          </CryptographicKeys>
          <OutputClaims>
            <OutputClaim ClaimTypeReferenceId="issuerUserId" PartnerClaimType="sub" />
            <OutputClaim ClaimTypeReferenceId="givenName" PartnerClaimType="given_name" />
            <OutputClaim ClaimTypeReferenceId="surName" PartnerClaimType="family_name" />
            <OutputClaim ClaimTypeReferenceId="displayName" PartnerClaimType="name" />
            <OutputClaim ClaimTypeReferenceId="authenticationSource" DefaultValue="federatedAuthentication" />
            <OutputClaim ClaimTypeReferenceId="identityProvider" PartnerClaimType="iss" />
            <OutputClaim ClaimTypeReferenceId="email" PartnerClaimType="email" />
            <OutputClaim ClaimTypeReferenceId="phone_number" PartnerClaimType="phone_number" />
            <OutputClaim ClaimTypeReferenceId="address" PartnerClaimType="address" />
            <OutputClaim ClaimTypeReferenceId="signInNames.emailAddress" />
          </OutputClaims>
          <OutputClaimsTransformations>
            <OutputClaimsTransformation ReferenceId="CreateRandomUPNUserName" />
            <OutputClaimsTransformation ReferenceId="CreateUserPrincipalName" />
            <OutputClaimsTransformation ReferenceId="CreateAlternativeSecurityId" />
          </OutputClaimsTransformations>
          <UseTechnicalProfileForSessionManagement ReferenceId="SM-SocialLogin" />
        </TechnicalProfile>
      </TechnicalProfiles>
</ClaimsProvider>
4) User Journey configuration
User Journey determines all steps of "business logic" that are executed during the authentication flow. The ClaimsProviderSelections element determines which authentication providers are visible for the user in the sign-in view in Azure AD B2C. In this case, IDPExchange is the new third-party IDP. Orchestration step 2 must contain a reference to the IDPExchange which was declared in the first step.
Note! The sample below does not contain all the required orchestration steps.
<UserJourney Id="SignUpOrSignInWithFederation">
      <OrchestrationSteps>
        <OrchestrationStep Order="1" Type="CombinedSignInAndSignUp" ContentDefinitionReferenceId="api.signuporsignin">
          <ClaimsProviderSelections>
            <ClaimsProviderSelection ValidationClaimsExchangeId="LocalAccountSigninEmailExchange" />
            <ClaimsProviderSelection TargetClaimsExchangeId="IDPExchange" />
          </ClaimsProviderSelections>
          <ClaimsExchanges>
            <ClaimsExchange Id="LocalAccountSigninEmailExchange" TechnicalProfileReferenceId="SelfAsserted-LocalAccountSignin-Email" />
          </ClaimsExchanges>
        </OrchestrationStep>
        <OrchestrationStep Order="2" Type="ClaimsExchange">
          <Preconditions>
            <Precondition Type="ClaimsExist" ExecuteActionsIf="true">
              <Value>objectId</Value>
              <Action>SkipThisOrchestrationStep</Action>
            </Precondition>
          </Preconditions>
          <ClaimsExchanges>
            <ClaimsExchange Id="SignUpWithLogonEmailExchange" TechnicalProfileReferenceId="LocalAccountSignUpWithLogonEmail" />
            <ClaimsExchange Id="IDPExchange" TechnicalProfileReferenceId="IDP-OAUTH" />
          </ClaimsExchanges>
        </OrchestrationStep>
</UserJourney>
Key findings and learnings
1) Federated sign-out to third-party OpenIdConnect IDP is not complete
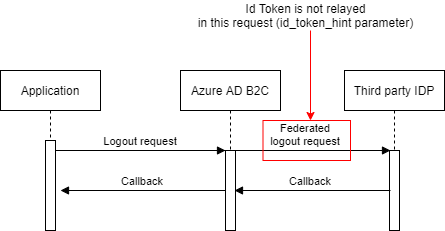
Azure AD B2C does not relay the ID token to the end-session endpoint of the third-party IDP. According to OpenIdConnect specs, it's recommended that an ID token should be relayed but Azure AD B2C does not support this right now. I also got confirmation about that from MS support.
It's also important that SingleLogoutEnabled is configured to true in the ClaimsProvider configuration otherwise federated sign-out is not executed.
<Item Key="SingleLogoutEnabled">true</Item>In our project, this was an issue because the third-party IDP required the ID token to finalize the complete sign-out. We had to make some modifications to the third-party IDP which enabled a smooth sign-out user experience even Id token was not relayed.
2) Usage of acr_values parameter
OpenId Connect protocol allows you to send custom parameters to the authorization endpoint by using the acr_values parameter. If you need to deliver custom static parameters to the third-party IDP you can determine acr_values as an Input Claim in the claims provider configuration.
<InputClaims>
	<InputClaim ClaimTypeReferenceId="acr_values" DefaultValue="custom1:Parameter1 custom2:Parameter2" />
</InputClaims>
3) Preconditions are a handy way to set conditions
Preconditions inside ex. The orchestration step allows you to control is the step is executed or not. For example, you can configure that the MFA step is not executed if specific claims conditions are fulfilled.
<OrchestrationStep Order="9" Type="ClaimsExchange">
          <Preconditions>
            <Precondition Type="ClaimEquals" ExecuteActionsIf="true">
              <Value>authenticationSource</Value>
              <Value>federatedAuthentication</Value>
              <Action>SkipThisOrchestrationStep</Action>
            </Precondition>
          </Preconditions>
          <ClaimsExchanges>
            <ClaimsExchange Id="PhoneFactor-Verify" TechnicalProfileReferenceId="PhoneFactor-InputOrVerify" />
          </ClaimsExchanges>
        </OrchestrationStep>
4) Claim resolvers
Claim resolvers in Azure AD B2C custom policies provide context information such as the policy name, request correlation ID, user interface language, and more. Especially very useful claim resolver is {oauth2:access_token} which allows to relaying user's access token of third-party IDP to the calling application. More info about claim resolvers.
5) Application insights for troubleshooting
Azure AD B2C has a feature that enables sending data to the Application Insights. Application Insight integration is a must-have thing because it really helps you in troubleshooting situations. This Microsoft article shows how to configure Application Insights for troubleshooting. Custom policies also support Application insight custom events which can be configured to the User Journey flow.
6) DevOps automation
Azure AD B2C deployment and configuration can be fully automatized with Azure DevOps. I'll write another blog post about that how we did it in the project.
7) Tools
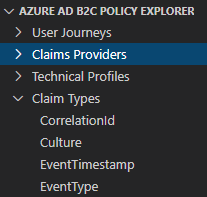
Visual Studio Code has Azure AD B2C custom policy extension which allows you to quickly navigate through Azure AD B2C custom policies. You can also create elements like technical profiles and claim definitions.

Summary
Azure AD B2C is a very powerful and scalable identity management solution for B2C cases. Identity Experience Framework (custom policy) configuration might first feel pretty complex "legacy" way to configure things in XML files but eventually, it's a very extendable and powerful way to handle even complex authentication scenarios. I first tested the out-of-the-box user journey but quite soon I realized that it's too simple and limited so only real option is custom policies. Azure AD B2C has some limitations like the federated sign-out issue which I covered earlier in this blog post but overall I'm going to use Azure AD B2C for other projects as well.
Comments