How has the tech stack of this blog evolved?

Iterations during the years
The first iteration (2018): Headless CMS + Azure App Service
I started blogging over four years ago and then I decided to use a Headless CMS solution for content creation and create the frontend layer by myself. Basically, the setup contained an ASP.NET Core application which was deeply integrated to the Headless CMS system via API, and everything was hosted in Azure App Service (B1 standard).
If you are more interested in the technical details, check the first "Hello Headless Blog" blog post from here.
The second iteration (2021): Minimizing hosting costs + manual publishing to GitHub Pages
During this iteration, the main theme was to minimize hosting costs. I decided to start using a static website (GitHub Pages) instead of using Azure App Service directly. GitHub Pages provided a free service to host a static website with custom domain support, so this was an easy choice. Azure Static Website was another alternative, but I decided to try GitHub Pages because I hadn't used that before.
Azure App Service still hosted ASP.NET Core-based blog application but it only provided dynamic content for website crawler application (HTTrack). HTTrack application's role was to crawl through the blog site and produce static files which were published to GitHub Pages. Visitors of the blog were redirected to GitHub Pages which hosted static files of this blog. Because visitors were no longer using the Azure App Service site directly, I switched the App Service Plan to F1 (free tier). The free tier provided a limited time of CPU minutes (60) per day but it's more than enough to enable that site to be up and running during the crawling.
The pain point of this implementation was that blog crawling with HTTrack and publishing files to GitHub Pages weren't automated. It took 10-15 min extra time every time when you published a blog post. You can read more details about this iteration from my blog post.
Third iteration (2022): Automated publishing to GitHub Pages
As said second iteration wasn't perfect because I had to execute site crawling and publish changes to GitHub manually. During this latest iteration, I automated those things, and you can read more about this iteration from this post.
How to automate site crawling and publishing to GitHub Pages?
Fully automated publishing looks like this.
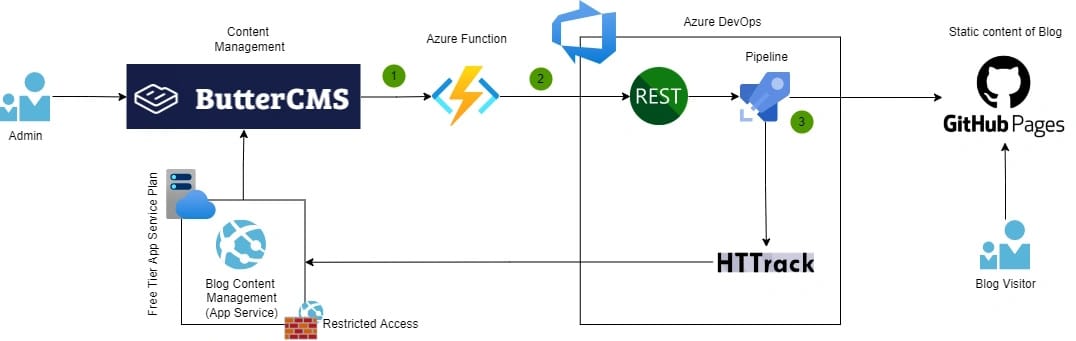
A short explanation of each step:
1. Event-driven communication (Webhooks)
The headless CMS system (ButterCMS) used in this blog supports Webhooks which allows lightweight event-driven communication between two applications. Webhooks are the key component to enable different kinds of automation. In this case, I subscribed to events from ButterCMS each time when blog post was published, updated, or deleted. These WebHook events are used to enable automatic blog site crawling and publishing to GitHub Pages.
2. Event processing (Azure Function)
Webhooks require an HTTP endpoint that receives and processes Webhook events. For that purpose, I created an HTTP trigger-based Azure Function in the Consumption Tier. Consumption plan pricing includes a monthly free grant of 1 million requests so I can easily use this for free.
Azure Function is responsible for identifying the right Webhook events (published, updated, deleted) and starting the DevOps Pipeline via Azure DevOps REST API.
If you're interested in how the Azure Function is implemented, you can find codes from this repository (GitHub).
3. Azure DevOps Pipeline
Azure DevOps Pipeline orchestrates the process of how the ASP.NET Core-based Blog site is crawled and how static files are published to GitHub Pages.
The pipelinethat has the following steps:
Step 1: Install httrack CLI tool
HTTrack CLI tool is the main component that handles the crawling and producing static files from the ASP.NET Core-based Blog site.
- script: |
    sudo apt-get update
    sudo apt install httrack webhttrack
  displayName: 'Install httrack'
Step 2: Clone the GitHub Pages repository
$(GitHubPersonalAccessToken) is a Pipeline variable.
- script: |
    mkdir /tmp/github
    cd /tmp/github
    git clone https://$(GitHubPersonalAccessToken)@github.com/[GIT_USERNAME]/[REPOSITORY].git .
  displayName: 'Clone repo'
Step 3: Add Azure DevOps IP address to access restriction
Public access to ASP.NET Core-based Blog application is allowed only from my home IP address by default. This YAML-pipeline task uses Azure CLI to temporarily allow Azure DevOps IP address to the Azure App Service application (network restriction).
- task: AzureCLI@2
  displayName: 'Allow DevOps IP to App Service'
  inputs:
    azureSubscription: ${{variables.azureServiceConnection}}
    scriptType: 'pscore'
    scriptLocation: 'inlineScript'
    inlineScript: |
      $devOpsIp = Invoke-RestMethod http://ipinfo.io/json | Select -exp ip
      az webapp config access-restriction add `
        -g ${{variables.deploymentResourceGroupName}} `
        -n ${{variables.appserviceResourceName}} `
        --rule-name AzureDevOps `
        --action Allow `
        --ip-address $devOpsIp `
        --priority 200
Step 4: Crawl the Blog site
This task executes HTTrack CLI tool which crawls the ASP.NET Core Blog site and persists static files to a folder that was created earlier.
- script: |
    httrack "https://[NAME_OF_THE_BLOG].azurewebsites.net" -O "/tmp/crawledsite" -v
  displayName: 'Copy static data from the Blog'
Step 5: Copy crawled static files to the GitHub folder
- script: |
    cp -R /tmp/crawledsite/[SITE_DOMAIN]/* /tmp/github
  displayName: 'Copy crawled static data to github folder'
Step 6: Commit changes to the GitHub Pages repository
- script: |
    cd /tmp/github
    git config --global user.email "my@email.com"
    git config --global user.name "Azure DevOps"
    git add -A
    git commit -m "Blog update"
    git push --set-upstream https://$(GitHubPersonalAccessToken)@github.com/[GIT_USERNAME]/[REPOSITORY] main
  displayName: 'Commit changes to GitHub'
Step 7: Remove Azure DevOps IP address to access restriction
- task: AzureCLI@2
  displayName: 'Remove DevOps IP to App Service'
  inputs:
      azureSubscription: ${{variables.azureServiceConnection}}
      scriptType: 'bash'
      scriptLocation: 'inlineScript'
      inlineScript: |
        az webapp config access-restriction remove \
          -g ${{variables.deploymentResourceGroupName}} \
          -n ${{variables.appserviceResourceName}} \
          --rule-name AzureDevOps
It was nice to get this finally automatized:)
Comments