Participant registration system for runners event

A few months ago I got a task to create a simple participant registration system (personal project). People are registering for the running event via this system. This blog post contains information on how this system was built. I'm interested in investigating new technologies so I decided to create a mixed system that uses Google and MS Azure platforms.
General requirements for the system
- Simple responsive registration form + thanks page
- Registered persons should be listed on the another application
- Admin users are already using the Google ecosystem
Solution architecture
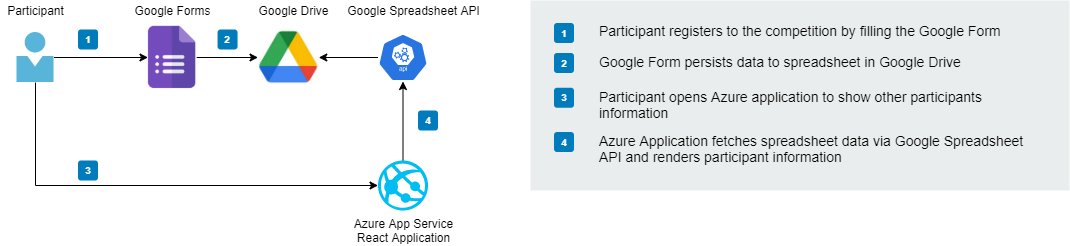
Registration form powered by Google Forms
Google Forms is a tool that makes it possible to create forms using the browser user interface. Microsoft has also a similar application called Microsoft Forms which requires an O365 subscription. Google Forms was an easy choice because admin users were already using Gmail email and Google Drive. More detailed information about how to use Google Forms can be found here. In this project, Google Forms is used to create registration forms for end users.
Let's start. First sign in with your Google account to the Forms site and design your form. Google Forms includes 12 field types: 9 question types, along with text, photo, and video fields. Registration form in this case has the following fields:
- Name (Text field)
- Distance (Radio button)
- Birth date (Date)
- Team (Text field)
- Street Address (Text field)
- Postal Number (Text field)
- City (Text field)
- Country (Text field)
- Phone number (Text field)
- Email (Text field)
- Gender (Radio button)
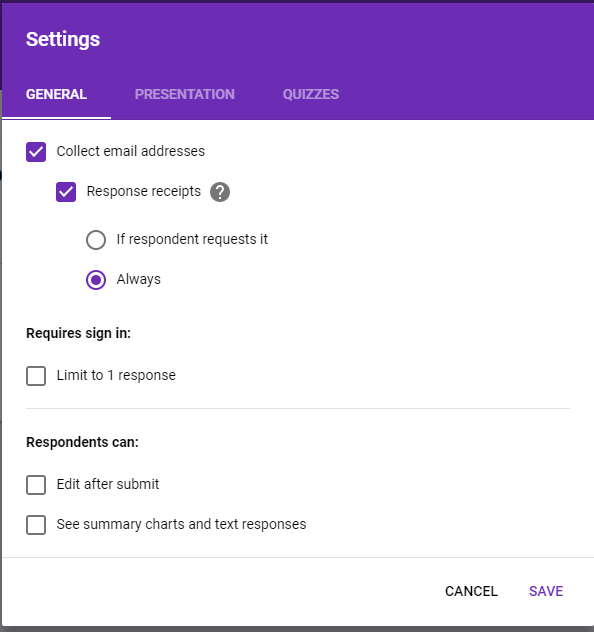
Form settings
From the settings view you can determine if email address collection is required. This setting creates an Email Address field at the top of the form.
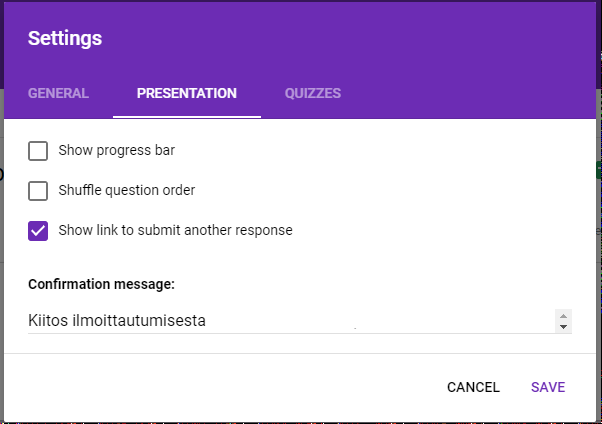
One requirement was to show a thank-you message. You can determine the confirmation message which is shown after submission from the presentation tab.
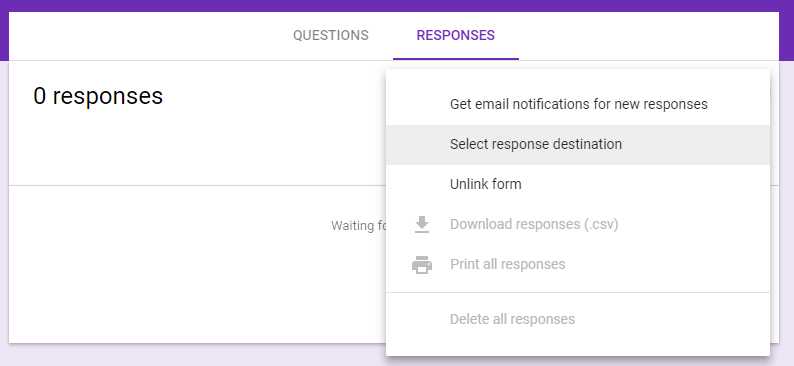
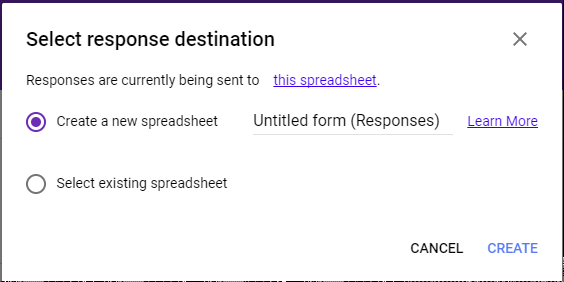
Response data destination
Google Forms stores data of the form in the Google Spreadsheet file which is stored in the Google Drive. If you want to change the name or destination of the spreadsheet where form data is stored open "Select response destination"
Now basic functionalities of the form are ready. Now Form can be embedded into the WordPress site using Iframe.
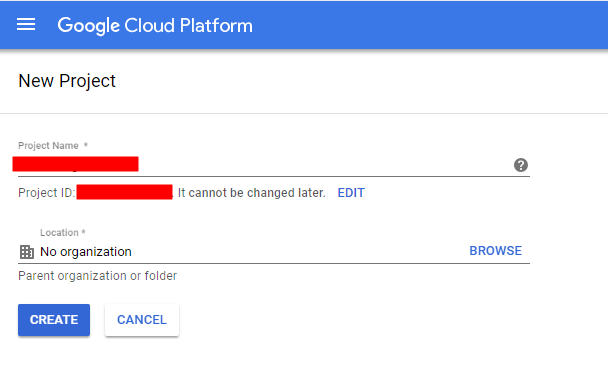
Enable Google Spreadsheet API
Next, we will configure Google APIs to allow external applications to fetch data from Google Spreadsheet. This external application will be created later. Open the Google Cloud console and sign in with your Google credentials. Give the name of the project and click Create.
Next, select APIs & Services and select Dashboard
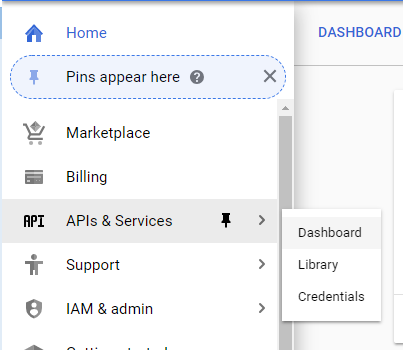
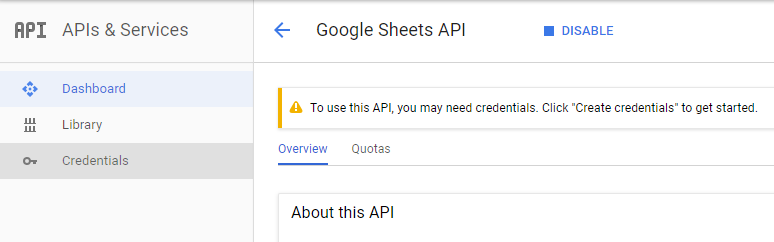
Click Enable APIs and Services

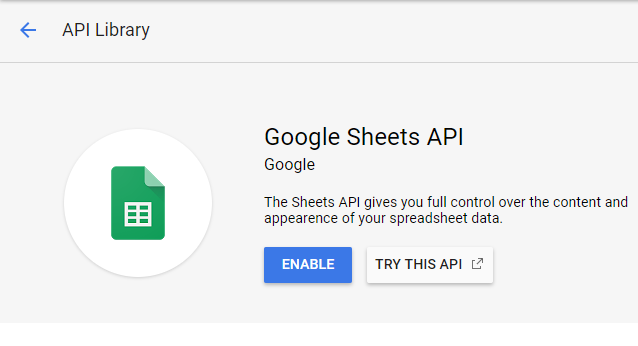
We are interested in Google Sheets API. Use Search to find Sheets API.
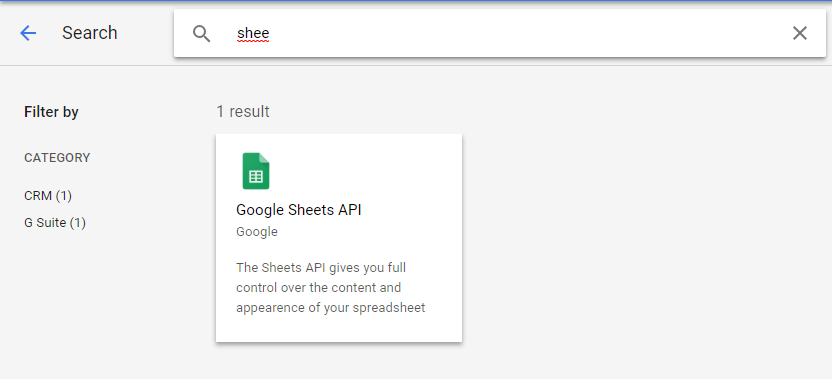
Enable Sheets API
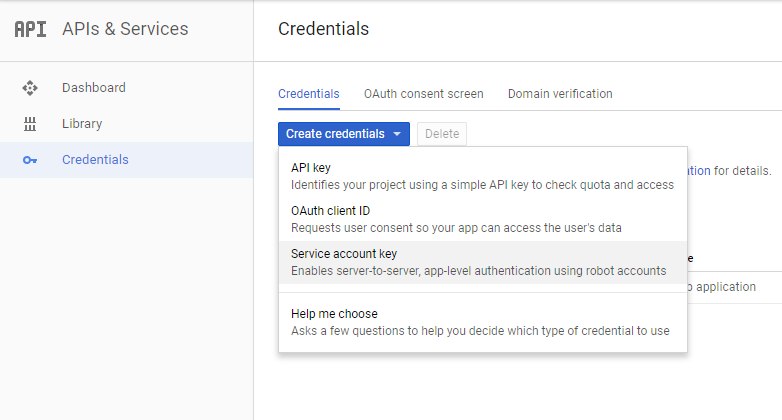
Next, select Credentials. We will create a service account which is later used in the Azure Web App to fetch data from Google API.
Select the Service account key under the Credentials Tab.
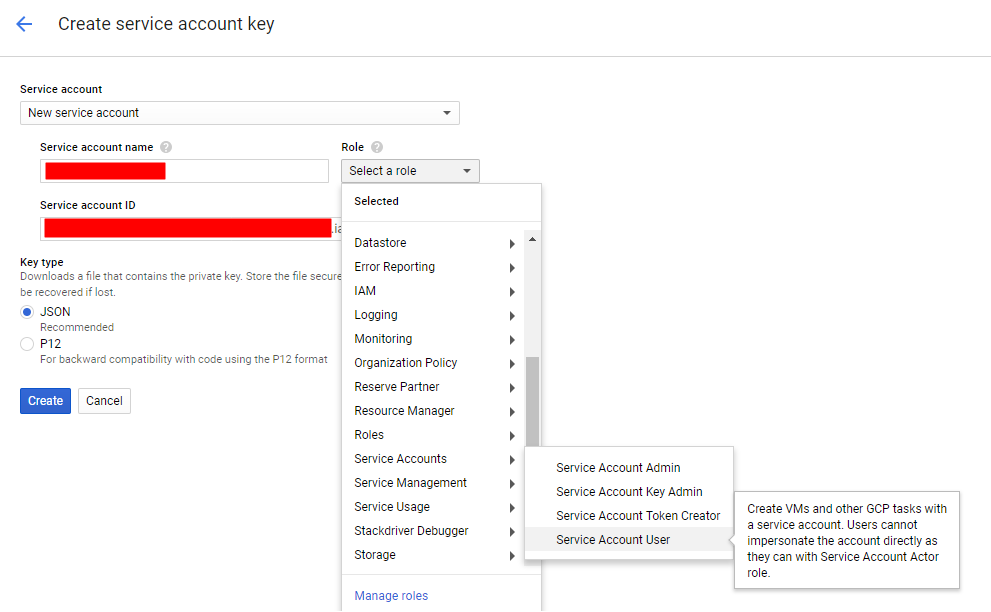
Give a name for the service account and select the Service Account User role. Select JSON key type which is also recommended by Google. After creation, you will get a JSON file that contains a private key for your client.
Example of private key JSON:
{
  "type": "service_account",
  "project_id": "",
  "private_key_id": "",
  "private_key": "-----BEGIN PRIVATE END PRIVATE KEY-----\n",
  "client_email": "",
  "client_id": "",
  "auth_uri": "https://accounts.google.com/o/oauth2/auth",
  "token_uri": "https://accounts.google.com/o/oauth2/token",
  "auth_provider_x509_cert_url": "https://www.googleapis.com/oauth2/v1/certs",
  "client_x509_cert_url": ""
}
Google Drive permissions
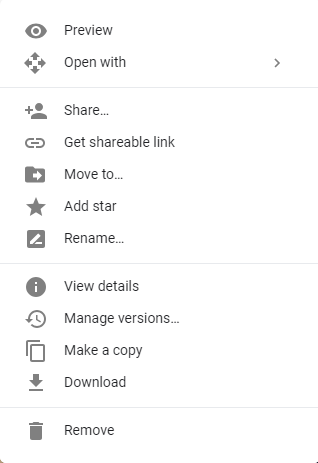
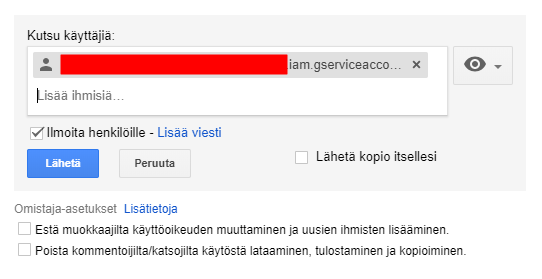
The service account that was created in the previous section has not permission to the any files in Google Drive. In this section, I will describe how you determine permissions for service accounts. Open Google Drive and find the Spreadsheet file where Google Forms stores the data. Right-click the top of the file and select Share.
Find the service account that was created in the previous phases. Give read permissions for the account.
Participant listing app (Azure hosted)
Registration data in Spreadsheet contains a lot of data about participants so we cannot use Spreadsheet file as it is. In this section, I will describe shortly how a small ASP.NET Core + React.js App is created to show only a few columns of data from Spreadsheet. This app will be hosted in Azure as a PaaS application. It's also possible to host ASP.NET Core applications in the Google cloud as well. I will investigate Google Cloud + .NET application possibilities later.
Install Google.Apis.Sheets.v4 NuGet package to your project.

How to use Google Sheets API
Back-end
First, you have to initialize the GoogleCredential object. You can use the FromJson method where you can pass private key JSON content as a string. On the application side, you can store JSON information ex. to the Key Vault in Azure.
string[] scopes = { SheetsService.Scope.SpreadsheetsReadonly };
GoogleCredential credential = GoogleCredential.FromJson(jsonData).CreateScoped(scopes);
SheetsService service = new SheetsService(new BaseClientService.Initializer()
{
    HttpClientInitializer = credential,
    ApplicationName = applicationName,
});
Next, create a Person object that describes the Registered person.
public class Person
{
    public string Name { get; set; }
    public string Team { get; set; }
    public string City { get; set; }
    public string Country { get; set; }
    public string Distance { get; set; }
    public string Gender { get; set; }
}
SpreadsheetFieldsEnum contains index numbers of each column in the Spreadsheet.
public enum SpreadsheetFieldsEnum
{
    Name = 1,
    Team = 4,
    City = 7,
    Country = 8,
    Distance = 2,
    Gender = 11
}
Before fetching data from the spreadsheet via API ID and name of the spreadsheet should be checked. Open Google Drive and open the Spreadsheet file. The spreadsheet ID is shown in the URL. The spreadsheet name is shown at the bottom of the screen when the spreadsheet file is open.

Fetching the data is a very straightforward process. Make get request to the specified spreadsheet and call the Execute method. Execute returns a response object where you can loop through data and create new Person objects.
SpreadsheetsResource.ValuesResource.GetRequest request = service.Spreadsheets.Values.Get(spreadsheetId, sheetName);

ValueRange response = request.Execute();

//skip first row because it contains header title information
return response.Values.Skip(1).Select(row => new Person()
{
    Name = ProcessRow(row, (int)SpreadsheetFieldsEnum.Name),
    Team = ProcessRow(row, (int)SpreadsheetFieldsEnum.Team),
    City = ProcessRow(row, (int)SpreadsheetFieldsEnum.City),
    Country = ProcessRow(row, (int)SpreadsheetFieldsEnum.Country),
    Distance = ProcessRow(row, (int)SpreadsheetFieldsEnum.Distance),
    Gender = ProcessRow(row, (int)SpreadsheetFieldsEnum.Gender)
}).ToList();
API Controller has GetRegisteredPerson action which returns a list of Person objects to the front-end.
[HttpGet("[action]")]
public List<Person> GetRegisteredPersons()
{
    List<Person> allRegistrations = new List<Person>();
    string[] scopes = { SheetsService.Scope.SpreadsheetsReadonly };

    var applicationName = _configuration[Constants.Constants.AppSettingKeys.APPLICATION_NAME];
    var spreadSheedIdFi = _configuration[Constants.Constants.AppSettingKeys.REGISTRATION_FORM_FI_SPREADSHEETID];
    var spreadSheedNameFi = _configuration[Constants.Constants.AppSettingKeys.REGISTRATION_FORM_FI_SPREADSHEET_NAME];

    if (string.IsNullOrEmpty(applicationName)){ return allRegistrations; }
    if (string.IsNullOrEmpty(spreadSheedIdFi)) { return allRegistrations; }
    if (string.IsNullOrEmpty(spreadSheedNameFi)) { return allRegistrations; }

    allRegistrations = FetchSpreadsheetData(spreadSheedIdFi, spreadSheedNameFi);

    return allRegistrations;
}
Front-end
I created a small React.js component that fetches data from the back-end controller and renders data to the table.
import * as React from 'react';
import { RouteComponentProps } from 'react-router';
import 'isomorphic-fetch';
import LocalizedStrings from 'react-localization';
import 'babel-polyfill';


let strings = new LocalizedStrings({
    en: {
        name: "Nimi/Namn",
        team: "Seura/Klubb",
        city: "Kaupunki/Stad",
        country: "Maa/Land",
        loading: "Ladataan/...",
        noRegistrations: "Ei ilmoittautuneita/Ej registrerad",
        women22km: "Naiset/Damer 22 km",
        men22km: "Miehet/Män 22 km",
        women10km: "Naiset/Damer 10 km",
        men10km: "Miehet/Män 10 km"
    }
});

const commonConstants = {
    gender: {
        female: 'Nainen / Kvinna',
        male: 'Mies / Man'
    }
}

interface RegisteredState {
    registeredPersons: Person[];
    loading: boolean;
}

interface Person {
    name: string;
    team: string;
    city: string;
    country: string;
    distance: string;
    gender: string;
}

export class Registered extends React.Component<RouteComponentProps<{}>, RegisteredState> {
    constructor() {
        super();
        this.state = { registeredPersons: [], loading: true };

        fetch('api/Registration/GetRegisteredPersons')
            .then(response => response.json() as Promise<Person[]>)
            .then(data => {
                this.setState({ registeredPersons: data, loading: false });
            });
    }

    public render() {
        let contents = this.state.loading ? <p><em>{strings.loading}</em></p> : Registered.renderRegisteredPersonsTable(this.state.registeredPersons);
        return <div>
            {contents}
        </div>;
    }

    private static renderRegisteredPersonsTable(registeredPersons: Person[]) {

        var firstColumn = {
            width: '150px'
        };

        var responsiveTable = {
            "overflow-x":"auto"
        };

        return <div style={responsiveTable}><table className='table'>
            <thead>
                <tr>
                    <th style={firstColumn}></th>
                    <th>{strings.name}</th>
                    <th>{strings.team}</th>
                    <th>{strings.city}</th>
                    <th>{strings.country}</th>
                </tr>
            </thead>
            <tbody>
                <tr className='active'><td colSpan={6}><strong>{strings.women22km}</strong></td></tr>
                {Registered.renderRegisteredPersonRows(registeredPersons, "22 km", commonConstants.gender.female)}
                <tr className='active'><td colSpan={6}><strong>{strings.men22km}</strong></td></tr>
                {Registered.renderRegisteredPersonRows(registeredPersons, "22 km", commonConstants.gender.male)}
                <tr className='active'><td colSpan={6}><strong>{strings.women10km}</strong></td></tr>
                {Registered.renderRegisteredPersonRows(registeredPersons, "10 km", commonConstants.gender.female)}
                <tr className='active'><td colSpan={6}><strong>{strings.men10km}</strong></td></tr>
                {Registered.renderRegisteredPersonRows(registeredPersons, "10 km", commonConstants.gender.male)}
            </tbody>
        </table></div>;
    }

    private static renderRegisteredPersonRows(registeredPersons: Person[], distance: string, gender: string) {

        let filteredData;

        filteredData = registeredPersons.filter((person) => (person.distance == distance && person.gender == gender));

        if (filteredData.length === 0) {
            return (<tr>
                <td colSpan={6}>{strings.noRegistrations}</td>
            </tr>)
        }
        return filteredData.map(function (registeredPerson, index) {
            return (<tr>
                <td></td>
                <td>{registeredPerson.name}</td>
                <td>{registeredPerson.team}</td>
                <td>{registeredPerson.city}</td>
                <td>{registeredPerson.country}</td>
            </tr>);
        })
    }
}
Now the solution is ready😄
Comments