What you should know when deploying .NET 6 application to Linux-based App Service?

I recently worked with the .NET 6 application and for cost-efficiency reasons, I decided to deploy the application to a Linux-based App Service. Everything didn't happen without problems so this blog post describes what you should know when deploying a .NET 6 application to Linux Linux-based app Service in Azure.
Why use Linux-based App Service?
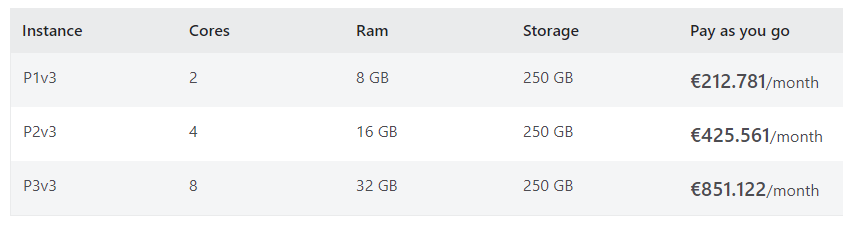
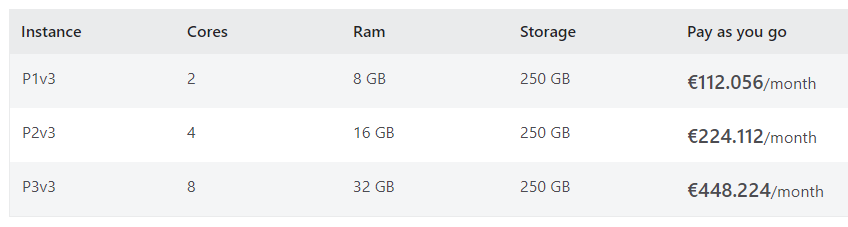
Nowadays Linux-based App Services have pretty much the same features as Windows but pricing is more attempting. Linux-based App Service is 50% cheaper than Windows counterpart. Pricing at 11.11.2021:
Windows-based App Service (Premium v3 Service Plan)
Linux-based App Service (Premium v3 Service Plan)
Notes about building Azure Infrastructure with Bicep
App Service Plan creation
I struggled for the some time with multiple provisioning errors after I noticed this blog post by the the Azure App Service team. You should determine reserved property to be the true to use Linux.
Quotation from the Windows-basedApp Service team blog:
Note that the kind property also shows up in App Service Plans (ASP). At this time, the value of this property for the ASP is meaningless and has no impact on your resource. For example, you can set kind to “Linux” for the ASP, but that won’t make your ASP a Linux ASP; the reserved property is what makes this distinction (if reserved= true, it’s a Linux ASP, otherwise it’s a Windows ASP).
Used Bicep code to create App Service Plan:
resource appServicePlan 'Microsoft.Web/serverfarms@2021-02-01' = {
  name: 'plan-myapplication'
  location: resourceGroup().location
  sku: {
    name: 'S1'
  }
  properties:{
    reserved: true
  }
  kind: ((appServicePlanPlatform == 'Linux') ? 'app,linux' : 'windows')
  tags:tags
}
App Service creation
When you're using Windows-based, App Service netFrameworkVersion property (Site configs) determines the runtime version like this:
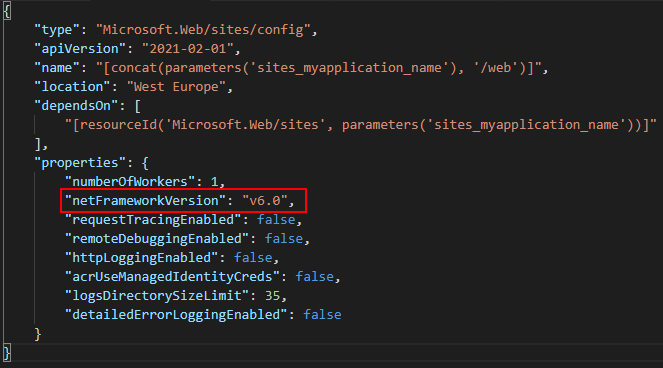
Unfortunately, the same property doesn´t work with Linux. Instead of netFrameworkVersion,that you have to use linuxFxVersion property.
Used Bicep code to create App Service Plan:
resource appService 'Microsoft.Web/sites@2021-02-01' = {
  name: 'app-myapplication'
  location: resourceGroup().location
  identity: {
     type: 'SystemAssigned'
  }
  properties:{
    serverFarmId: appServicePlan.id
    reserved: true
    siteConfig:{
      alwaysOn: true
      ftpsState: 'Disabled'
      appSettings: appSettings
      linuxFxVersion: 'DOTNETCORE|6.0'
      http20Enabled: true
    }
    httpsOnly: true
  }
  tags:tags
}
There are a few things that you should know about linuxFxVersion property values. A list of available built-in runtime values for web apps (Linux) can be retrieved with the following Azure CLI command:
az webapp list-runtimes --linuxCurrently (11/2021) command returned the following values:
[
"DOTNETCORE|2.1",
"DOTNETCORE|3.1",
"DOTNET|5.0",
"DOTNET|6.0",
"NODE|14-lts",
"NODE|12-lts",
"NODE|10-lts",
"NODE|10.1",
"NODE|10.6",
"NODE|10.14",
"JAVA|8-jre8",
"JAVA|11-java11",
"TOMCAT|8.5-jre8",
"TOMCAT|9.0-jre8",
"TOMCAT|8.5-java11",
"TOMCAT|9.0-java11",
"JBOSSEAP|7-java8",
"JBOSSEAP|7.3-java8",
"JBOSSEAP|7-java11",
"JBOSSEAP|7.3-java11",
"PHP|7.3",
"PHP|7.4",
"PYTHON|3.8",
"PYTHON|3.7",
"PYTHON|3.6",
"RUBY|2.5",
"RUBY|2.6"
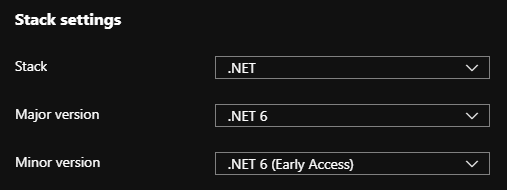
]But value DOTNET|6.0 is not working and after deployment Stack selection is empty.

Instead of DOTNET|6.0 you have to use DOTNETCORE|6.0 to get this working.
Notes about deploying application (YAML)
Set runtime argument value to linux-x64 in publish task like this:
    - task: DotNetCoreCLI@2
      displayName: Create application artifact
      inputs:
        command: publish
        projects:  '**/*.csproj'
        arguments: '--configuration 'Release' --framework 'net6.0' -r 'linux-x64' --self-contained false --output $(Build.ArtifactStagingDirectory)'
        modifyOutputPath: false
        publishWebProjects: false
        zipAfterPublish: True
YAML Deploy pipeline
Application is executed in Container so you have to manually set Startup Command to get the application running. It took some time to figure this out.
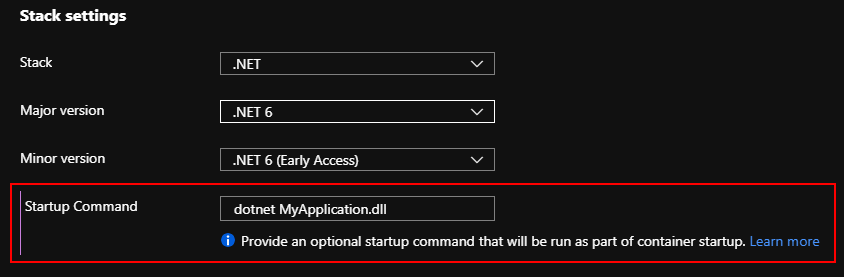
You can use startUpCommand property to configure application start-up in the application deployment task:
         - task: AzureWebApp@1
            displayName: Deploy application
            inputs:
              appType: 'webAppLinux'
              azureSubscription: 'azure-dev'
              appName: 'app-myapplication'
              package: "$(System.ArtifactsDirectory)/application/*.zip"
              deploymentMethod: 'zipDeploy'
              startUpCommand: 'dotnet MyApplication.dll'
Application settings
When using Linux you have to change the app setting key separator from colon (:) which is typically used in Windows platform to double underscore (__). Note! underscore separator should also work in Windows.
[
  {
    "name": "Idp__Authority",
    "value": "https://auth.server.fi",
    "slotSetting": false
  },
  {
    "name": "KeyVault__Uri",
    "value": "https://kv-myapplication.vault.azure.net/",
    "slotSetting": false
  }
]
Comments